Wednesday 24 July 2013

How To - Fruit nails

There is nothing better in the summer sunshine than eating fresh summer fruits. Well now you can have the look of summer fruits on your nails in my step-by-step guide to fruity nails. In this I will show you how to do both strawberry and watermelon nails.

Start by painting your nails with a base coat, to protect the nails from staining. Next paint the nails with two coats of a red polish. I used Maybelline color show in Power Red. I only did an accent nail for this design, but you can do as many nails as you wish.

 Next, take a green striper and create a zig-zag pattern across the top of the nail. To make sure that I got the shape that I wanted, I drew the outline on my nail with a white nail art pen, and then went over this line with the striper. Fill in the top section of the nail with two coats of green polish applied with the striper.

Finally, take a white striper or nail art pen and draw small lines or dots onto your nail. When these have dried, go over them with a yellow colour. Doing this will help the yellow to stand out much more on the red background. Finish your design with a top coat to blend all the layers together and you are done!

Next, how to do watermelon nails. 

Start by applying a base coat to protect your nail. Next cut two pieces of masking tape into thin strips, and apply them to your nail so that you create a small triangle shape. You only want to apply these to a small section of the nail, as you only want to create a basic triangle shape.

Apply one or two coats of red polish, I used the same Maybelline polish as before. Whilst the polish is still a little tacky, carefully remove the tape.

You should be left with something that looks like this.

Apply a white line of polish to the bottom of your nail. Do this slowly to get the most even line. Don't panic if the line isn't straight, you can go back and fix this later. I used L.A colors color craze nail polish in Energy Source.

Once the white is dry, go over this with a line of green, leaving a small gap of white poking out of the top. I used L.A colors color craze nail polish in Palm Tree. Once the green is dry, if you are not happy with the white line, go back over it with a white striper, as this will give you more control and a neater line. 

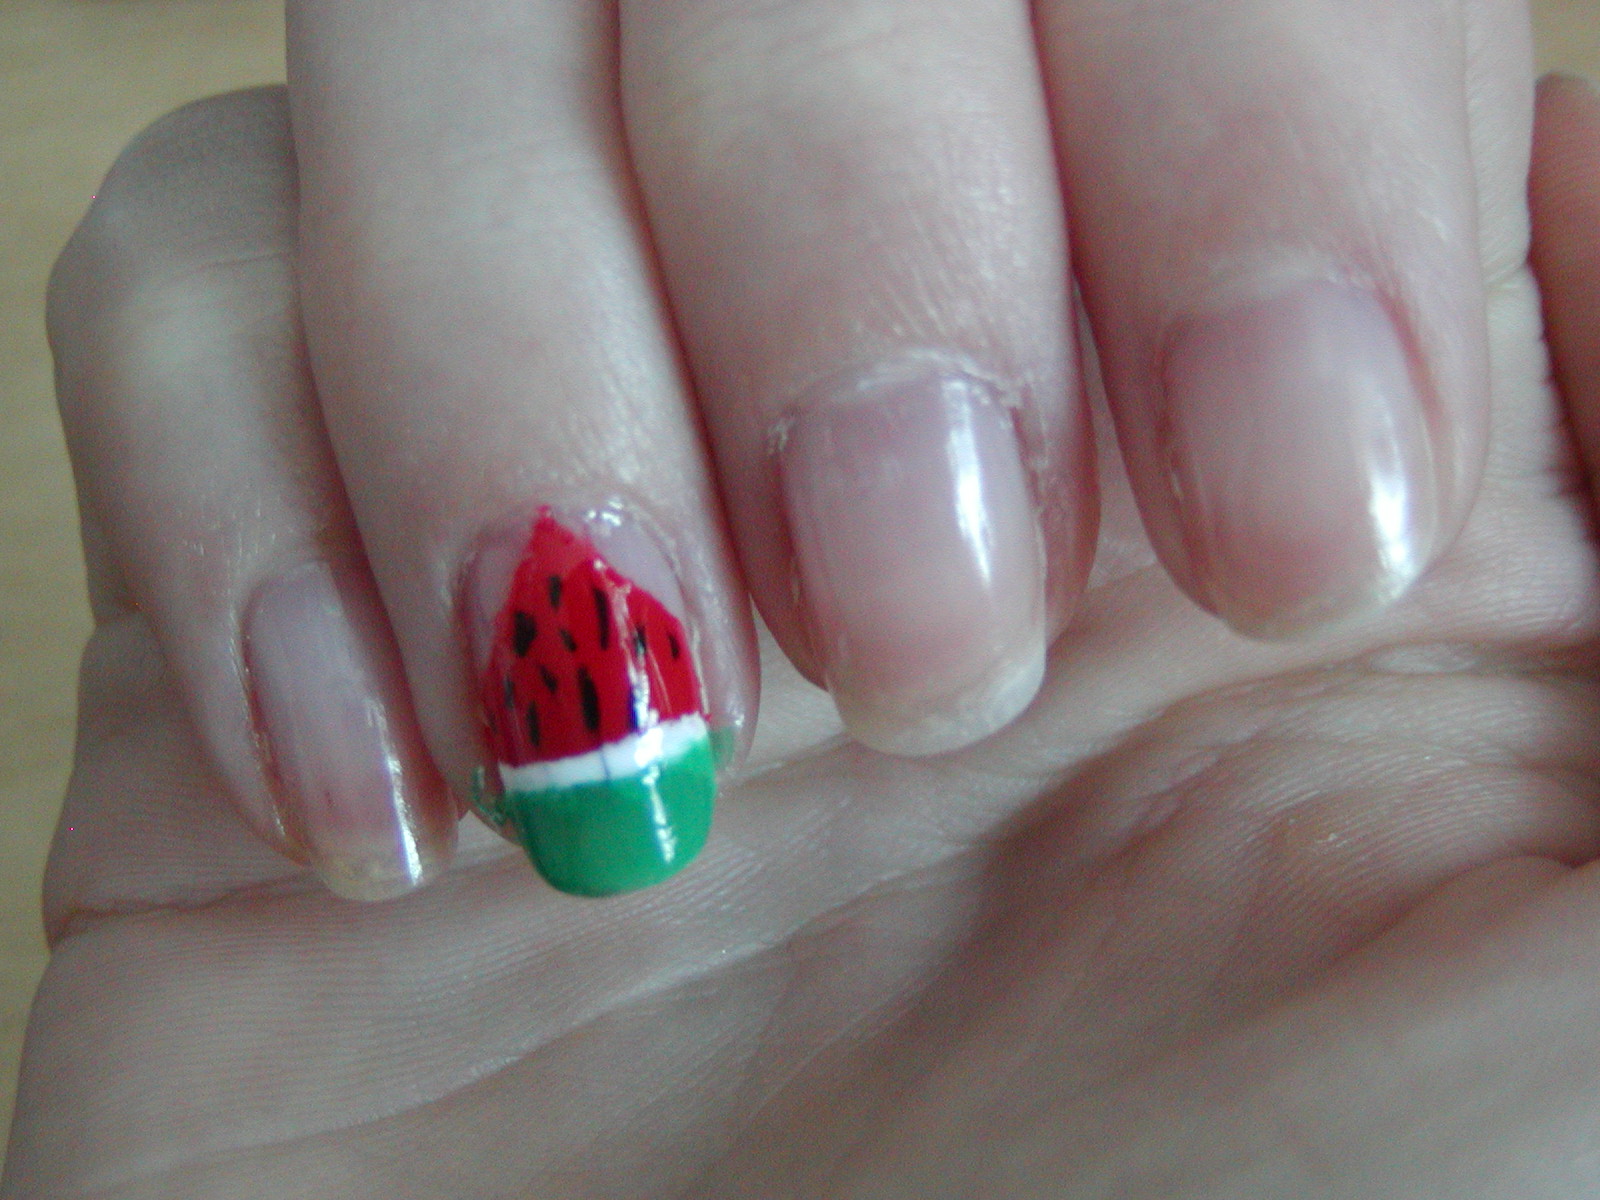
Using a striper or a dotting tool, draw on black lines to create the watermelon seeds. Finish with a top coat to protect your design, and help blend all the layers together.

And that's how easy it is to create fruit effect nails that look good enough to eat. 


Wednesday 17 July 2013

How to - French tips with a difference - Pretty pastels

Nothing says girly and elegant more than the classic French tip nail design. But sometimes this design can seem quite plain, so today I will be showing you how to do a different take on the classic design using pretty pastel colours, in step-by-step photos.

Start by painting your nails in a base coat to help the nail polish to stick. Then cut masking tape into small strips and use these to tape off the bottom of your nails. You can use French tips, but I find using masking tape easier. 


Using any pastel colour that you want, paint the bottom of your nails. I couldn't decide between pink or blue, so I did alternating nails. I used Maybelline Color show polishes in Cool Blue and Pink Boom.


Whilst your nail varnish is still a little tacky, gently and carefully remove the tape. If you are left with a little ridge where the polish met the tape, you can very gently tap this down to make it less noticeable.  


 Using a nail striping brush, chose the same colour polish but in a darker shade, to create vertical lines down the tips.


Do the same on the other nails. My striper brush was actually a very similar colour to my base colour, so I wiped off the excess varnish and dipped it into a dark pink polish that I had to make these lines more noticeable. 


Finish off with a top coat to blend all the layers together and to help your design last longer. 

And there you have it, an easy and different take on the classic French Tip. You could use any colour that you wanted with this design, as long as you used a pastel for the base and a darker colour for the lines. I hope you enjoyed this step-by-step guide, let me know what you think of it via twitter, my profile is linked in my name down below. 


Monday 8 July 2013

How to - Monsters Inc Nails

With Monsters University being released on July 12th, it looks like our 2 favourite Monsters are set to take over the world once more. So I decided to show you an easy step-by-step guide on how to do Sully and Mike inspired nails.

 Start off with a base coat to help the nail polish stick and to protect your nails. Then paint all of your nails except for your ring finger in a turquoise polish. I used Barry M Gelly Hi-Shine nail paint in Greenberry.

Next paint your ring finger in a green colour. I used L.A Colours color craze nail polish in Palm Tree, but as this was too dark of a green I mixed it with a little white to make it lighter. (I know this polish looks the same as the others but that's just the way the flash made it look)

Next use a light purple nail polish to create Sully's spots. I used an old nail polish CoverGirl Nailslicks in Tornado. You can either paint the polish on using the brush provided, or for a more precise option, use a large dotting tool. Be aware that if you use a dotting tool, depending on how thick the polish is applied, it could take a while to dry.

For Mike's face, use a white nail art pen to draw a large circle onto the nail, and then colour it in. To make it a little neater looking, use a black nail art pen to draw a neat line around the eye. I used Barry M nail art pens. You could also use a large dotting tool with white polish and outline it with a striper if you don't have nail art pens.

Use a smaller dotting tool, and add a splodge of blue or green polish for his Iris. (Mike actually has green eyes, but I put blue polish on before I realised what colour they were)

Use the nail art pen to draw a small circle for the pupil. Draw a smile in any shape you want and use the white nail art pen to dot teeth along the top and bottom of his mouth.

Add a top coat to the design to help blend all the different layers together and to help protect the polish, and you are done.

And there you have it, an easy and fun Monsters Inc nail art design. For an added wow factor, you could put some fur effect dust onto Sully's spots. Makeup Academy Fuzzy Fluff Fur-Effect nails would be great for this. 

By Lucy Bunce