By Lucy Bunce
Friday, 13 September 2013
Katy Perry 'Roar' Inspired Tiger Nails
Here at Love Nail Art Forever, I am a huge fan of Katy Perry. So when she released her ultra catchy song Roar, it was the perfect inspiration I needed to create a tiger inspired manicure. So here it is, I hope you like this manicure, and keep looking back for more.
Wednesday, 24 July 2013
How To - Fruit nails
There is nothing better in the summer sunshine than eating fresh summer fruits. Well now you can have the look of summer fruits on your nails in my step-by-step guide to fruity nails. In this I will show you how to do both strawberry and watermelon nails.


Start by painting your nails with a base coat, to protect the nails from staining. Next paint the nails with two coats of a red polish. I used Maybelline color show in Power Red. I only did an accent nail for this design, but you can do as many nails as you wish.

Next, take a green striper and create a zig-zag pattern across the top of the nail. To make sure that I got the shape that I wanted, I drew the outline on my nail with a white nail art pen, and then went over this line with the striper. Fill in the top section of the nail with two coats of green polish applied with the striper.

Finally, take a white striper or nail art pen and draw small lines or dots onto your nail. When these have dried, go over them with a yellow colour. Doing this will help the yellow to stand out much more on the red background. Finish your design with a top coat to blend all the layers together and you are done!
Next, how to do watermelon nails.

Start by applying a base coat to protect your nail. Next cut two pieces of masking tape into thin strips, and apply them to your nail so that you create a small triangle shape. You only want to apply these to a small section of the nail, as you only want to create a basic triangle shape.

Apply one or two coats of red polish, I used the same Maybelline polish as before. Whilst the polish is still a little tacky, carefully remove the tape.

You should be left with something that looks like this.

Apply a white line of polish to the bottom of your nail. Do this slowly to get the most even line. Don't panic if the line isn't straight, you can go back and fix this later. I used L.A colors color craze nail polish in Energy Source.

Once the white is dry, go over this with a line of green, leaving a small gap of white poking out of the top. I used L.A colors color craze nail polish in Palm Tree. Once the green is dry, if you are not happy with the white line, go back over it with a white striper, as this will give you more control and a neater line.
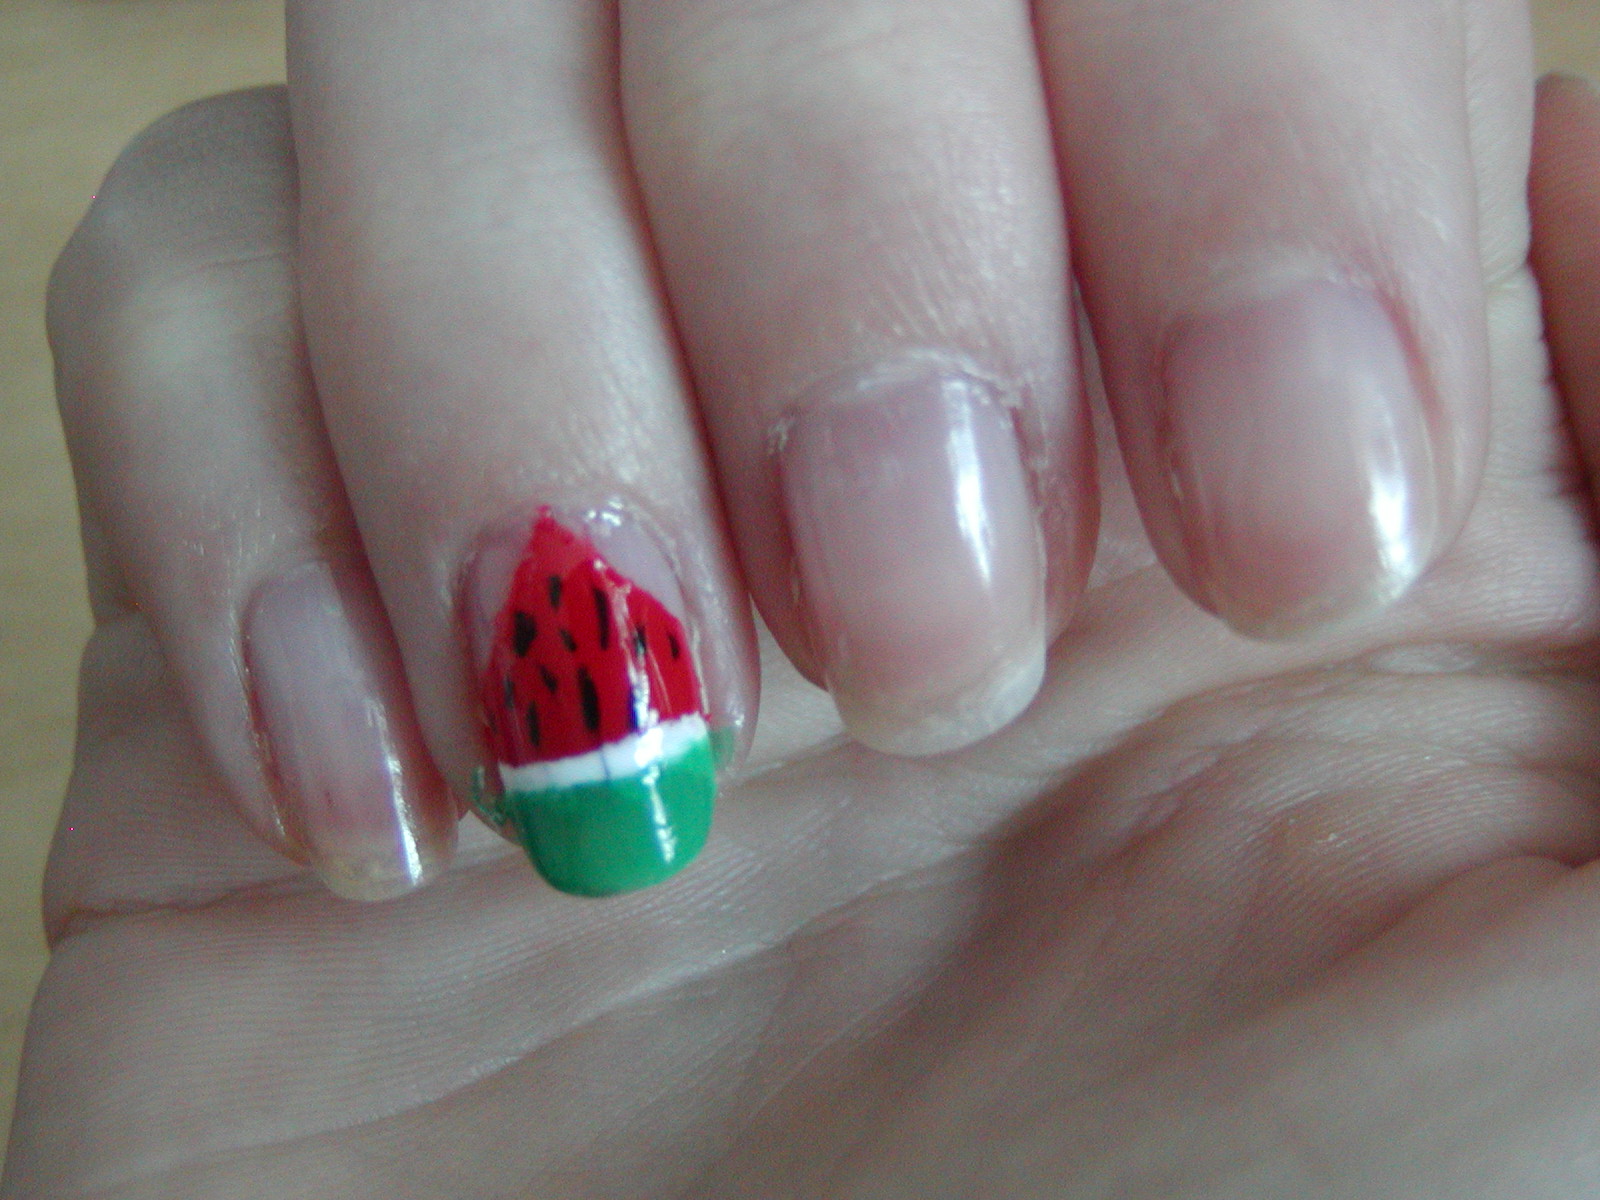
Using a striper or a dotting tool, draw on black lines to create the watermelon seeds. Finish with a top coat to protect your design, and help blend all the layers together.
And that's how easy it is to create fruit effect nails that look good enough to eat.
By Lucy Bunce
Wednesday, 17 July 2013
How to - French tips with a difference - Pretty pastels
Nothing says girly and elegant more than the classic French tip nail design. But sometimes this design can seem quite plain, so today I will be showing you how to do a different take on the classic design using pretty pastel colours, in step-by-step photos.


Start by painting your nails in a base coat to help the nail polish to stick. Then cut masking tape into small strips and use these to tape off the bottom of your nails. You can use French tips, but I find using masking tape easier.

Using any pastel colour that you want, paint the bottom of your nails. I couldn't decide between pink or blue, so I did alternating nails. I used Maybelline Color show polishes in Cool Blue and Pink Boom.

Whilst your nail varnish is still a little tacky, gently and carefully remove the tape. If you are left with a little ridge where the polish met the tape, you can very gently tap this down to make it less noticeable.

Using a nail striping brush, chose the same colour polish but in a darker shade, to create vertical lines down the tips.

Do the same on the other nails. My striper brush was actually a very similar colour to my base colour, so I wiped off the excess varnish and dipped it into a dark pink polish that I had to make these lines more noticeable.

Finish off with a top coat to blend all the layers together and to help your design last longer.
And there you have it, an easy and different take on the classic French Tip. You could use any colour that you wanted with this design, as long as you used a pastel for the base and a darker colour for the lines. I hope you enjoyed this step-by-step guide, let me know what you think of it via twitter, my profile is linked in my name down below.
By Lucy Bunce
Monday, 8 July 2013
How to - Monsters Inc Nails
With Monsters University being released on July 12th, it looks like our 2 favourite Monsters are set to take over the world once more. So I decided to show you an easy step-by-step guide on how to do Sully and Mike inspired nails.


Start off with a base coat to help the nail polish stick and to protect your nails. Then paint all of your nails except for your ring finger in a turquoise polish. I used Barry M Gelly Hi-Shine nail paint in Greenberry.
 Next paint your ring finger in a green colour. I used L.A Colours color craze nail polish in Palm Tree, but as this was too dark of a green I mixed it with a little white to make it lighter. (I know this polish looks the same as the others but that's just the way the flash made it look)
 Next use a light purple nail polish to create Sully's spots. I used an old nail polish CoverGirl Nailslicks in Tornado. You can either paint the polish on using the brush provided, or for a more precise option, use a large dotting tool. Be aware that if you use a dotting tool, depending on how thick the polish is applied, it could take a while to dry.
 For Mike's face, use a white nail art pen to draw a large circle onto the nail, and then colour it in. To make it a little neater looking, use a black nail art pen to draw a neat line around the eye. I used Barry M nail art pens. You could also use a large dotting tool with white polish and outline it with a striper if you don't have nail art pens.
 Use a smaller dotting tool, and add a splodge of blue or green polish for his Iris. (Mike actually has green eyes, but I put blue polish on before I realised what colour they were)
 Use the nail art pen to draw a small circle for the pupil. Draw a smile in any shape you want and use the white nail art pen to dot teeth along the top and bottom of his mouth.
 Add a top coat to the design to help blend all the different layers together and to help protect the polish, and you are done.
By Lucy Bunce


And there you have it, an easy and fun Monsters Inc nail art design. For an added wow factor, you could put some fur effect dust onto Sully's spots. Makeup Academy Fuzzy Fluff Fur-Effect nails would be great for this.
By Lucy Bunce
Friday, 28 June 2013
Maybelline color show nail polish review
Every week, it seems that a new type of
nail polish product is being created, each one claiming to be bigger and better
than the last ‘new thing’. The latest company doing this is Maybelline, with
their new color show nail polish. The product claims to be a new gel based
formula, with colour popping pigments that gives you bold, crisp, chip
resistant colour.
The reason that I first tried these nail
polishes is because I absolutely loved the MNY my varnish nail polishes that
Maybelline used to do, and I was disappointed when I couldn’t find it anymore.
But with all its bold claims, I thought I would give their new product a try.

A selection of the different colours, taken from the Maybelline website
But do all these claims really hold any
truth? Well I have to be honest, these nail polishes are both brilliant, but
bad at the same time. I own six different colours, and the darker colours,
Urban Turquoise and Power Red, are some of the best nail polishes I have ever
used. They go on amazingly well, giving really bold intense colour even with
just one coat, but with two your nails stand out so much.
Watery Waste, a silver colour, doesn’t give
quite as much of a bold colour as the darker ones in just one coat, but that’s
obviously a given. And then we come to the lighter colours, Cool Blue, Pink
Boom and Winter Baby. I cannot believe how different these colours can be from
the darker ones. When I tired to apply this to my nails without any base coat,
the polish just seemed to slip from my nails and fall and sit in the sides of
my nail, which is not a good look. However with a base coat applied the colour
does seem to redeem itself, and be almost as good as the darker colours.
However, Winter Baby, in my opinion, is a
compete waste of money. I just can’t seem to get on with this nail varnish. To
get any kind of colour from it you have two options, put on a thicker layer and
wait ages for it to try and dry, or put on thinner coats and have to put on at
least three for it to make any kind of impact, and doing this takes a long
time.
Because I work as a cleaner my hands and
nails take more of a beating day to day than other people’s hands would, so I
found that the claims it was chip resistant weren’t strictly true, but it does
last a lot longer than most polishes I have used.
So all in all, this nail polish offers
mixed results, with the darker colours being amazing bold and easy to apply,
and lighter colours being more subdued and a little trickier to apply. But for
only £2.99, which is amazingly cheap compared to some other companies out
there, it is a good nail polish.
By Lucy Bunce
Wednesday, 19 June 2013
My nail art essentials
When doing nail art, it is essential that
you have the right tools for the job. So here are a list of all the tools and
polishes that I think you need for doing really good nail art.
1.
A good base coat – Now not all
people agree with applying a base coat. Some people see is as a waste of time,
or that it takes too long. But I couldn’t disagree more. I think a base coat is
super important, not just to protect your nails from becoming weak and stained,
but also to help the polish stick better to the surface of your nail. My
favourite base coat is Avon nail experts adhesive base coat. It makes your nail
varnish stick like glue, and is amazing at protecting nails from damage.
2.
A good quality nail varnish –
Now this really depends on what you class as a good quality nail varnish, but I
find as a base colour, nail polishes that are a little thinner in consistency
work well. I like Maybelline colour show (look for a review of this product
coming soon). But for doing design work, I find thicker nail varnishes to be
good, such as Barry M, as they won’t bleed and will hold their design better
than thinner polishes.
3.
A top coat – Now a top coat is
different to a clear nail varnish. In the past, I have used clear nail polish
as a top coat and it works fine on just regular painted nails. But on nails
that have an intricate design, I find that clear polish can drag and blur the
design, which doesn’t happen when you use a top coat, so it’s a good
investment.
4.
Dotting tools – I love dotting
tools, they are so versatile, not only can you just do dots with them, but with
the smaller tools you can do more intricate designs, like drawing pictures on
your nails, which is easier than doing it with a brush. I have Cheeky double-sided
dotting tools, and they are fantastic. Dotting tools are cheap enough to buy
from Amazon, but if you don’t want to buy them, you can use things from around
the house, like the bottom of a make up brush, or the bottom of a pin, whatever
you can find that will create dots.
5.
Nail striping brushes – These
come in either sets or individually and are small pots of nail polish that
contain a small brush for applying it to the nail. You don’t have to buy these
specifically, and if you wanted to make your own stripers, you can cut an old
paint brush down to size, or use an old eyeliner brush.
6.
Masking tape – Masking tape is
a brilliant way of achieving different techniques on your nails. You can use it
to create squares, triangles or any shape, and it can be used to create French
tips or half moon manicures. I think masking tape works much better than cello
tape as it is less sticky and is therefore easier to remove from the nail,
whilst doing the least amount of damage to your manicure.
7.
Nail polish remover – A pretty
obvious choice, and you can use whatever you want, ordinary nail polish
remover, the pads, or the new pots, which allow you to soak your nail. Either
way your going to need good quality stuff, because sometimes you can have a few
layers on your nails, and it takes a while to remove it.
So there you have it, these are my
essential tools for doing nail art. You don’t need them all, but I think with
all of these you can create any design possible on your nails. If there is
anything you think I have missed, don’t hesitate to comment.
By Lucy Bunce
Thursday, 13 June 2013
Nail Plates – A Bundle Of Fun?
If you have never tried them before nail plates are an absolutely
amazing way of jazzing up your nails if you are a novice nail artist, if you
aren’t very creative, or if you don’t have the steadiest of hands. So when I
decided that I wanted to expand my collection of nail plates (I already had
three Konad plates given to me by a friend), I began looking around Amazon. And
I was shocked to find that Konad nail plates sell for £6 per plate. And that’s
when I discovered Bundle Monster.
And boy am I glad I did. After reading some of the reviews people
had written about the plates, saying that they weren’t engraved deep enough to
pick up any polish, and that, in a nutshell, they were rubbish, I was a little
apprehensive.
But after deciding to ignore the reviews and see for myself, I
ordered the Bundle Monster 21 piece stamping kit, each plate containing 6
designs (that’s a total of 126 designs) for just £14.99.
And all I can say is I have no idea what any of those negative reviews
were about. They must have been talking absolute rubbish, because to me, these
plates are amazing. They come with a protective blue film covering the top of
each plate so they don’t get damaged in transit, and even though on Amazon it
tells you not to forget to peel these off before use, I, I’m sure like the
people who hated the product, almost forgot to. With the blue film on, of
course the engraving isn’t going to be deep enough to pick up polish.
The plates are amazing, and come with three different types of
print, fun individual designs, like grapes, lips and heart designs, French tip
designs, and full nail designs. I experimented with all of these when my plates
first arrived, and each one of the turned out fine. I wouldn’t say they were
perfect as some designs are very intricate and did struggle to pick up the full
effect, but it picked up enough to still look fabulous.

What the nail plates look like
However if you are thinking of buying these plates I will give you
some tips. These plates work amazingly as long as you use them properly. If you
think that you can just buy these plates and go, you are wrong. You also need a
scraper, to remove the excess paint and to press it into the design, and you
also need a stamper to transfer it onto the nails. These don’t come with the
plates, but are cheap enough to buy separately.
Also DO NOT try and use ordinary nail polishes. This seems to be a
regular mistake that people make. Regular polishes are no way near thick
enough, so I would suggest buying a proper Konad special nail polish. I have a
white, pink and a black one, and the black one works brilliantly, picking up
far more detail that the lighter colours.
And always remember to clean the polish off of the plates after use,
as this can build up and take away the smaller details.
The only downside that people may find with this product is the size
of the full nail prints. I have very small nails, so the designs fit onto mine
with room to spare. However if your nails are on the larger side, then you
might be left with a gap on either side.
So there you have it, for such a cheap product Bundle Monster nail
plates are amazing, and if you are thinking of trying nail art yourself, I couldn’t
recommend these enough.
By Lucy Bunce
Tuesday, 11 June 2013
Introduction
Hello everyone and welcome to my new blog, Love Nail Art Forever. As you can probably tell from the name, I love all things nail related, and this blog is my way of expressing that.
On this blog, I will write reviews of new nail art products that I try, I will talk about what new trends are heading our way, and I will also show off some nail art designs that I try, and much, much more.
So if you love nail art, this is definitely the blog for you.
Lucy Bunce
On this blog, I will write reviews of new nail art products that I try, I will talk about what new trends are heading our way, and I will also show off some nail art designs that I try, and much, much more.
So if you love nail art, this is definitely the blog for you.
Lucy Bunce
Subscribe to:
Posts (Atom)